![]()
M113 MRV |
Terry Ashley is webmaster of the excellent Perth Military Modelling
Society site. HyperScale is very pleased to present Terry's M113 MRV. You can see
more of Terry's models, as well as reviews, galleries and more feature articles, by
visiting the PMMS Website.
![]()
AFV Club's FSV is built basically out of the box for this article. This is to demonstrate what is in the kit and explain any problems with construction. I have already started a second kit, this time including all the alterations and adding the detail for an up-to-date Aussie MRV. Most of these alterations relate to small details - there aren't any major errors. AFV Club has done well in providing the larger parts required, although there are a couple of bits missing as noted below.
Let's clear up one small point to start with - the name. The vehicle is actually called M113A1 MRV (Medium Reconnaissance Vehicle). The earlier vehicle with the Saladin turret was the FSV (Fire Support Vehicle).
With that bit of trivia out of the way, let's have a quick look at what's in the box.
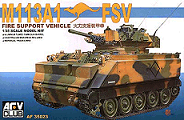 The kit is a
co-operative effort between AFV Club and Academy and, like the Dragon Shermans,
comes with it's own spares box.
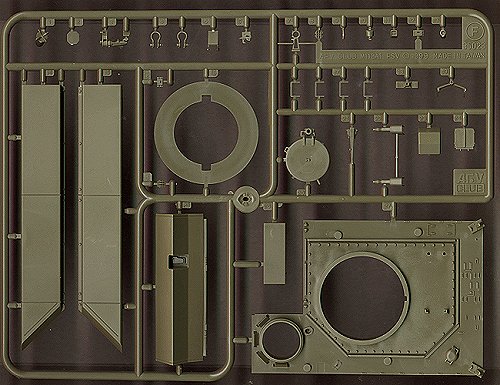
The kit comprises 8 sprues and a lower hull "bathtub". 6 sprues of individual track links and a turned aluminum barrel. Three of the sprues come straight from the Academy M113 kits - the road wheels plus two others from which only a few small parts are used here. The main hull tub is also from Academy. Four sprues are from AFV Club's Scorpion kit, two for the turret and the two road wheel sprues. These are only included for the periscopes and other small turret bits on the same sprue. One new sprue from AFV Club contains all the parts to make the Aussie MRV.
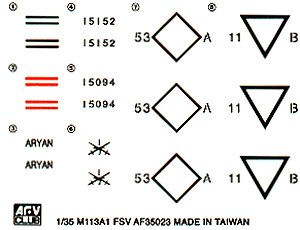 The decal
sheet has markings for two vehicles, one in overall desert sand and the other in
the great looking three colour cam scheme currently used on Australian Army
vehicles.
One noticeable thing is the difference in quality of the Academy and AFV Club parts in the kit. While the AFV Club parts are up to today's standards the Academy bits look dated. There is excessive flash on some parts, especially the smaller bits (eg. Headlights) and the fit leaves a bit to be desired in places. Had AFV Club done the whole kit themselves the overall quality would have been better, but due to economics chose the co-operative route.
![]()
Steps 1 to
4:
As you would expect this starts with the lower hull and suspension.
In the Academy M113s the wheels are attached using ploy caps, but these are
omitted here and the wheels are glued directly to the axles. The fit of the
separate axles is very precise and gives good alignment of the wheels. I left
the wheels off until after painting for easier handling. The rear hull plate has
the first of the new bits added. These are the two traffic indicators with wire
guards (these are well moulded) and the field telephone container. I removed the
mounded on tiedowns from the rear of the hull either side of the door, as they
aren't on the MRV. Take care with the placement of the field telephone
container, it is not fitted in the center of right rear, but toward the center
of the vehicle. The instructions give a good plan view of the rear hull, which
shows the correct placement.
Step 5:
This is the upper hull parts. The top hull plate is a new part with
good detail definition. There are some small imperfections around the turret
ring due to the thickness of the plastic, but these are hidden when the turret
is fitted. As mentioned the fit and quality of some of the Academy bits here are
a worry. I had to use masking tape to hold the engine intake covers in place
while the glue dried to get a snug fit. The headlight parts and front lifting
eyes had excessive flash and I had to trim the lifting eyes as these clashed
with the light assemblies. To the upper hull is fitted the new square exhaust
outlet and fire extinguisher cover (both correct for the MRV). The driver's
hatch is very well done in representing the Aussie style hatch. This is a
spring-loaded hatch that lifts up and swings to the left. Also present is the
hatch-securing latch on the left side of the hull, used to clamp the hatch when
open. The driver's periscopes have separate guards, which look good. At the rear
are the two prominent lifting shackles at each corner and the storage box behind
the turret. On the front plate is the travel lock for the barrel. All these
parts are well moulded and fit with no problems. One part missing is the rear
jerry can holder (left rear of hull). The kit provides US style cans on the
Academy sprues, but without holder. The MRV uses distinctive Aussie style jerry
cans.
Step 6:
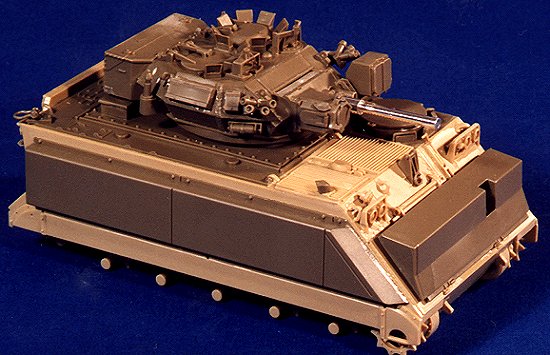
The turret is all AFV Club Scorpion with a number of new bits for the
MRV. The turret fitted together well, the only alterations were to fill the
locating holes on the two upper rearmost turret plates (next to the storage
bins). These are clean on the MRV's apart from the lifting eyes and the new
arial mount on the lower sections. The periscopes had small sink marks in the
lenses, but apart from that there were no other problems with the parts. The
turret has excellent detail with the large weld seams well represented along
with the front mounted search light boxes and hatch detail. The new MRV parts
include the second searchlight mount and box on the mantlet, the two machine gun
mounts fitted over the commander's and loader's main periscope sights. The two
rear arial mounts are also provided. Omitted again are the prominent jerry can
holders which should be fitted to both sides of the rear storage box. The gun
barrel is in turned aluminum and this is fitted to the mantlet with super glue I
had to enlarge the locating hole in the mantlet slightly to fit the gun. The gun
usually has a canvas dust cover fitted, but this is not included in the kit.
Step 7:
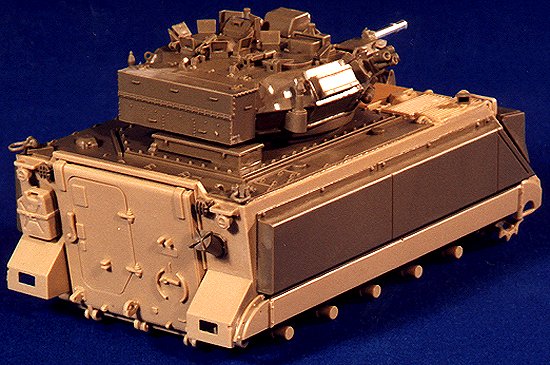
Final assembly: Fitted to the front plate is the full length
floatation tank along with the two side mounted tanks. These are fitted to
compensate for the extra weight of the turret when swimming. The side tanks fit
snugly above the side skirts and level with the front hull. The side skirts must
be fitted before the side tanks.
Track
Assembly:
The tracks are all separate links and have quite good detail. They
have the bolthead on the inside that holds the rubber pad in place. There is
some sink holes in the centre of the pad on some links. A direct comparison with
ModelKasten Set K-17 shows the AFV Club tracks up well, with the Kasten tracks
having larger sinkholes in most pads. The sinkholes on Academy's original M113
track links could see you fall in never to be seen again. There are enough links
without sink holes to use around the drive sprocket and idler wheels while the
links with sink holes can be used along the top and bottom runs. As the top
length of track can't be seen due to the side skirts, I didn't bother to fit
them, this made fitting the tracks easier as well. The links themselves fit
snugly together. To fit them to the vehicle I held the length of assembled links
together with a strip of masking tape and after bending around the drive and
idler wheels applied liquid cement to hold them in place. After the glue had
dried I removed the tracks from around the wheels and painted them separately,
reattaching them after painting but before final weathering. I had fitted the
side skirts during construction and inserted the assembled tracks after
painting. In hindsight it would have been easier to leave the skirts off until
the tracks had been fitted. The skirts could be temporarily attached for
painting to get the cam scheme flow right and then permanently attached after
the tracks. This would leave more room to fit the tracks.
![]()
The instructions are a little vague for the camouflaged paint scheme. You get a four-view plan showing the scheme, but not an overhead view. The colours are given as Light Khaki, Dark Green and Flat Black. No paint numbers are given.
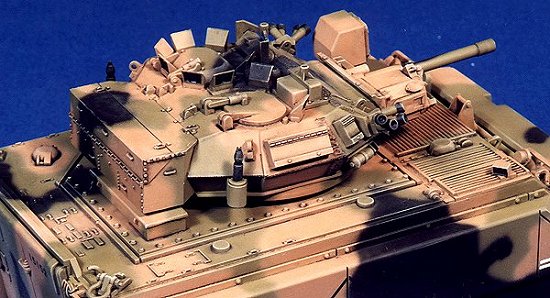
The actual colours used on the MRV are Light Tan (FS 30219), Flat Black (FS 37038) and Dark Green. This Green doesn't have an FS equivalent, being an exclusive Australian colour. It's official number is 7650/ADE(M)-146-1/1, quite a mouthful. I painted the model using Humbrol enamels and probably the best match is the old Humbrol Authentic colour MC21 'French Artillery Green'. I'm not sure if there's an equivalent in the current Humbrol range? Most other paint brands have FS equivalents in their paints for the Tan and Black, but you may have to match the green by eye. Another solution would be to use Medium Green (FS 34102) with a few drops of white added. It should also be noted that the scheme has an 'official' layout, but as it's applied by hand with a spray gun some variations are inevitable. All the road wheels and undersides of the lower hull are painted the Dark Green.
I firstly sprayed an overall coat of green followed by the Tan and Black sections. One thing with an intricate paint scheme is the inevitably overspray. For this reason don't worry if the paint scheme isn't spot on first time. As a rule, I go back over some spots two or three times covering bits of overspray and correcting other small 'disasters'. Once the cam scheme is finished and allowed to dry overnight, I applied a coat of gloss for the decals.
![]()
Unfortunately the decals are not up to today's standards. They are overly thick and don't react well with decal setting solutions. They don't stick well to the model either and easily came away from the surface after drying. Fortunately, the majority of decals go on flat surfaces, except for the rear of the turret storage box. The kit details here are very prominent and no matter how much decal setting solution or other coaxing I used the decal refused to adhere over the raised detail. I ended up discarding this decal and even after it had set for a day, peeled off without any objection. If these decals aren't applied to a gloss surface you can forget about eliminating air bubble "silvering". The decal sheet also gives you the small reflective strips attached to each corner of the hull sides. You get red for the rear and black for the front. This is fine for the desert cam but the three colour scheme has white strips on the front. This is shown on the box top illustration, but not on the decal sheet. I replaced these strips with Letraset rub on lines of red and white. After the decals had dried, I applied a final coat the Matt varnish to flatten the paint and hold the decals in place.
Weathering: I kept weathering to a minimum here to show off the actual model and can scheme. The vehicles are regularly washed and kept fairly clean by their units. If you are modelling an MRV on exercise out in the bush then they would be covered with heavy layers of dust, even more so when trundling around the North of Australia. Here they get really covered in the red dust this region is "famous" for. This dust gets in everywhere and almost eliminates the cam scheme after a while. I firstly applied a light wash of thinned black oil paint to highlight the details and then added the weathering from light drybrushing and a fine overspray of dust.
![]()
The model scrubs up into a nice replica of the MRV. Aside from the small problems outlined above with the older Academy bits and some omissions of new bits, the finished model "looks" like an MRV. As with any model there is room for improvement and additional detailing and this model is no exception. The box top illustration shows the main areas needing attention. The rear turret storage box Jerry can holders, the canvas cover to the main gun and a small stowage box added to the left turret side and the correct colour reflective strips.
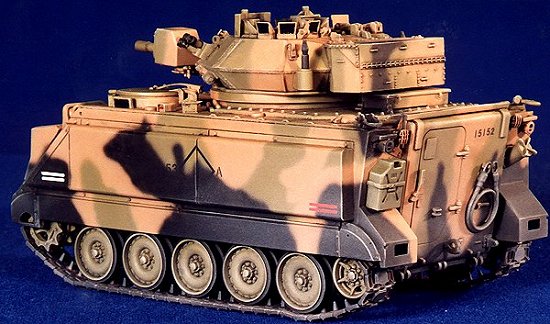
I would recommend the kit for any fan of the M113 family, this will be a good addition to the collection. It is an excellent basis for a highly detailed model.
![]()
![]() Model, Article Text and Photographs Copyright © 1999 by Terry Ashley
Model, Article Text and Photographs Copyright © 1999 by Terry Ashley
Page Created 02 September, 1999
Last Updated 05 June, 2001
Back to Anzac Steel Main Page
Back to HyperScale Main Page
Back to HyperScale Features Index